机器学习的基本问题是利用模型对数据进行拟合,学习的目的并非是对有限训练集进行正确预测,而是对未曾在训练集合出现的样本能够正确预测。模型对训练集数据的误差称为经验误差,对测试集数据的误差称为泛化误差。模型对训练集以外样本的预测能力就称为模型的泛化能力,追求这种泛化能力始终是机器学习的目标。
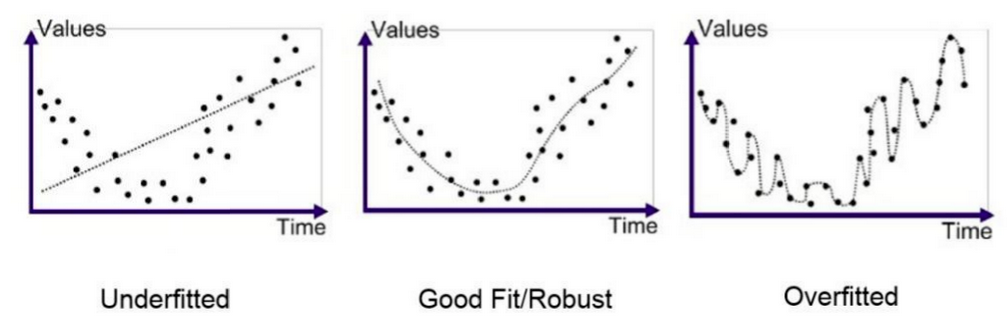
过拟合(overfitting)和欠拟合(underfitting)是导致模型泛化能力不高的两种常见原因,都是模型学习能力与数据复杂度之间失配的结果。“欠拟合”常常在模型学习能力较弱,而数据复杂度较高的情况出现,此时模型由于学习能力不足,无法学习到数据集中的“一般规律”,因而导致泛化能力弱。与之相反,“过拟合”常常在模型学习能力过强的情况中出现,此时的模型学习能力太强,以至于将训练集单个样本自身的特点都能捕捉到,并将其认为是“一般规律”,同样这种情况也会导致模型泛化能力下降。过拟合与欠拟合的区别在于,欠拟合在训练集和测试集上的性能都较差,而过拟合往往能较好地学习训练集数据的性质,而在测试集上的性能较差。在神经网络训练的过程中,欠拟合主要表现为输出结果的高偏差,而过拟合主要表现为输出结果的高方差
代码示例如下:
建立测试数据:
import numpy as np
import matplotlib.pyplot as plt
import pandas as pd
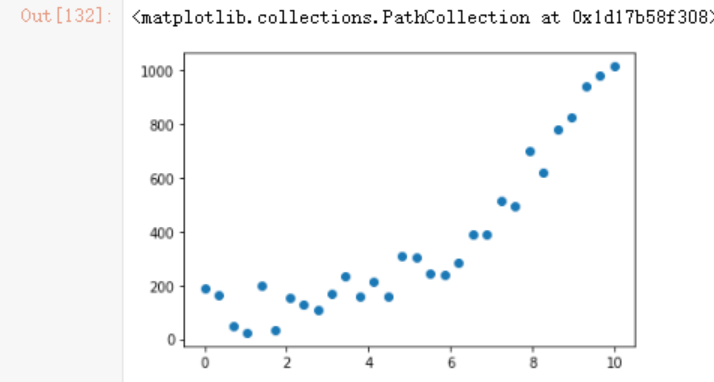
x = np.linspace(start=0,
               stop=10,
               num=30)
y = x**3 + np.random.rand(30)*200
plt.scatter(x,y)
假设使用一元线性回归方程式来建立模型,妥妥的欠拟合
from sklearn.linear_model import LinearRegression
model1 = LinearRegression()
model1.fit(x.reshape(-1,1),
           y.reshape(-1,1))
plt.scatter(x,y)
plt.plot(x,model1.predict(x.reshape(-1,1)),
        c='r')
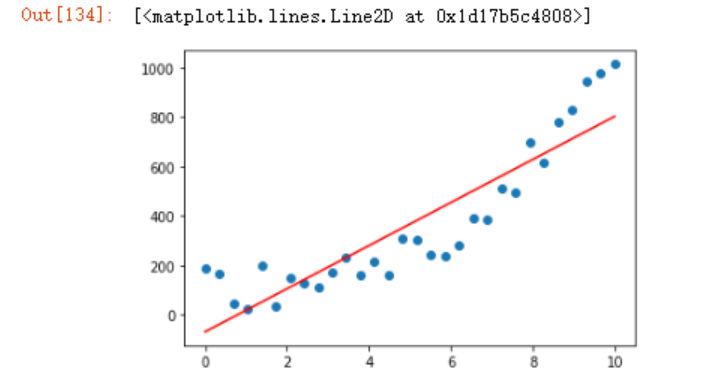
可以看到这在训练集上面的拟合程度都很低,更不用说测试集上了。
过拟合的模拟
#使用20阶方程式
#快速构建多项式
from sklearn.preprocessing import PolynomialFeatures
q20 = PolynomialFeatures(degree=20)
x_ = q20.fit_transform(x.reshape(-1,1))
model2 = LinearRegression()
model2.fit(x_,
           y.reshape(-1,1))
plt.scatter(x,y)
plt.plot(x,model2.predict(x_),
        c='g')
可以看到这个训练集上面的模拟效果是极好的。
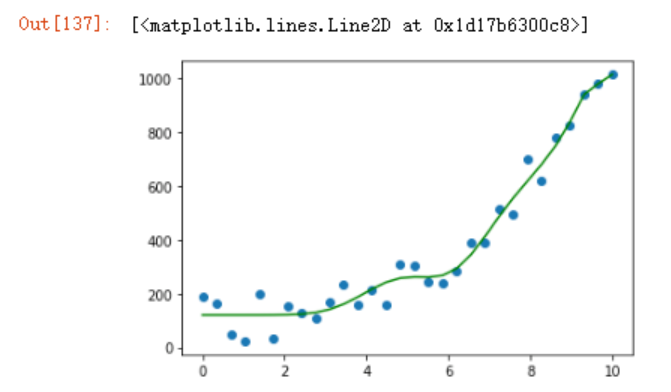
如果使用3阶方程式呢
q3 = PolynomialFeatures(degree=3)
x_q3 = q3.fit_transform(x.reshape(-1,1))
model3 = LinearRegression()
model3.fit(x_q3,
           y.reshape(-1,1))
plt.scatter(x,y)
plt.plot(x,model3.predict(x_q3),
        c='r')
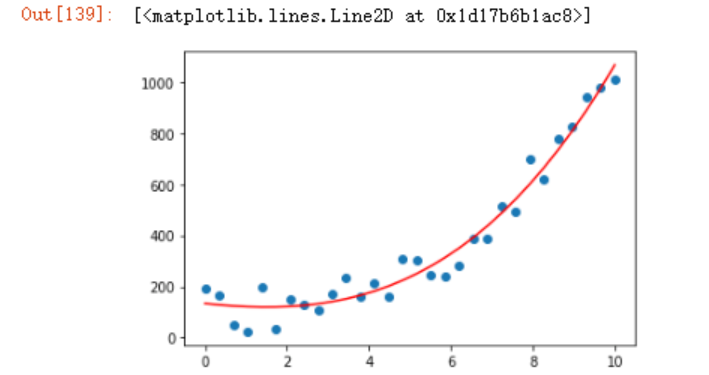
效果看起来也还不错。
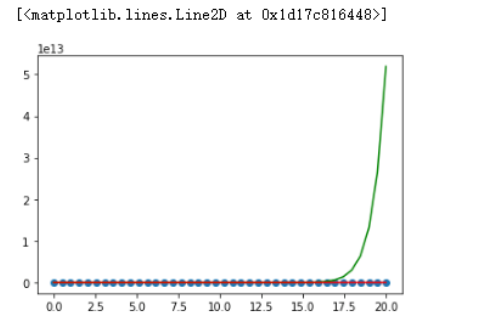
但假如我们现在扩充一下数据
x = np.linspace(start=0,
               stop=20,
               num=40)
y = x**3 + np.random.rand(40)*200
q20 = PolynomialFeatures(degree=20)
x_ = q20.fit_transform(x.reshape(-1,1))
model2 = LinearRegression()
model2.fit(x_,
           y.reshape(-1,1))
q3 = PolynomialFeatures(degree=3)
x_q3 = q3.fit_transform(x.reshape(-1,1))
model3 = LinearRegression()
model3.fit(x_q3,
           y.reshape(-1,1))
绘图查看,可以看到20阶方程式的在17.5之后一飞冲天,泛化能力太差,这就是所谓的过拟合。
plt.scatter(x,y)
plt.plot(x,model2.predict(x_),
        c='g')
plt.plot(x,model3.predict(x_q3),
        c='r')
决策树的初步了解
决策树的算法原理:决策树是一种树形结构,其中每个内部节点表示一个属性上的测试,每个分支代表一个测试输出,每个叶节点代表一种类别。
举个简单例子,张三想要跟好人做朋友,但怎么定义好人呢?于是他做了个决策树模型:
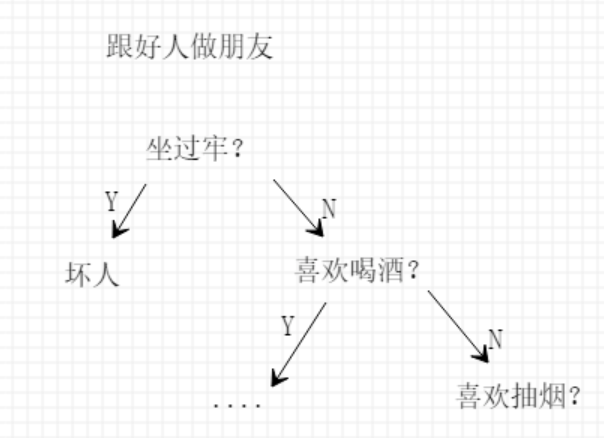
以上,根节点包含了样本的全集,每个分枝点代表对某一特征属性的一次测试,每条边代表一个测试结果,叶子顶点代表某个类或类的分布。
从这个算法原理里面,我们可以考虑一个问题,上图根节点下面的“坐过牢”和“喜欢喝酒”两个特征可以互换吗?换句话说,特征值的顺序能否更改?
这里面需要引入名词“信息熵”,熵本质指一个系统“内在的混乱程度”,1948年,信息论之父香农(C.E.Shannon)用信息熵的概念来描述信源的不确定度;另外一个名词叫做“信息增益”,信息增益代表了在一个条件下,信息复杂度(不确定性)减少的程度,决策树算法中,到底按照什么标准来选择哪一个特征以用信息增益来度量,如果选择一个特征后,信息增益最大(信息不确定性减少的程度最大),那么我们就选取这个特征。
还是以上面为例,假设有份表格数据中显示,喜欢喝酒的好人和坏人各占一半,但坐过牢的好人和坏人1:9开,那么此时我们选择什么特征进行分类呢?如果以“喝酒”为特征进行分类没有任何意义,信息还是很混乱,而以“坐牢”为特征进行分类,区分就很明显,可以获得更大的信息增益。
由于决策树的会对训练样本完美的分类,所以经常会出现过拟合情况。解决办法有三种:
- 预剪枝(prepruning):设定一个阈值,信息嫡减小的数量小于这个值,停止创建分支;一旦停止,节点就成为树叶。该树叶可以持有子集元组中最频繁的类
- 后剪枝(postpruning):决策树创建完成后,对节点检查其信息嫡的增益。
- 控制决策树的最大深度
决策树算法实例
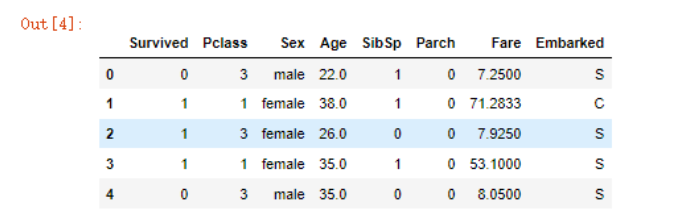
泰坦尼克号获救预测数据,来源于互联网。
data = pd.read_csv('train.csv')
data.head()


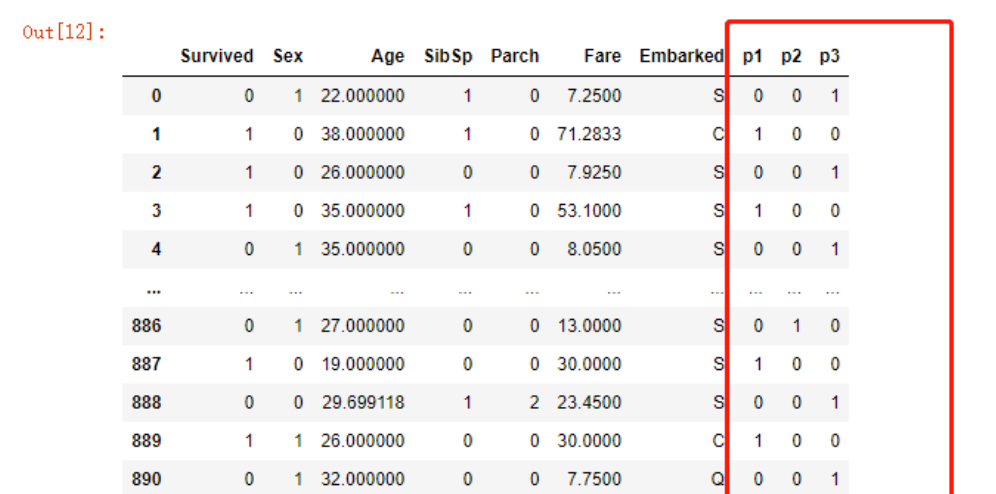
通过上面这张图,我们取出对获救可能有影响的特征:
df = data[["Survived","Pclass","Sex","Age","SibSp","Parch","Fare","Embarked"]]
df.head()
df = df.dropna(how='all')
df
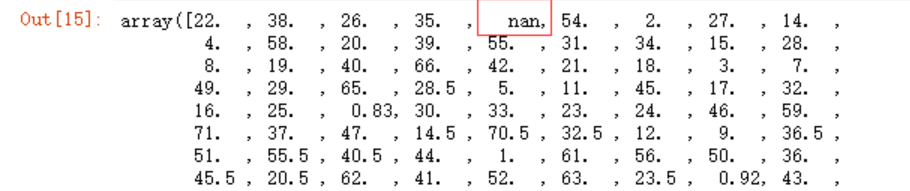
通过unique函数观察,发现这些特征里面存在空值和NaN,对于年龄,我想以均值来填充,而对于其它特征为空的内容统一填充为0
df.Age.unique()
df.Embarked.unique()
values= {'Age':df.Age.mean(),
        'Embarked':0}
df.fillna(value=values,
         inplace=True)
df.fillna(0,inplace=True)
还有一些数据预处理的工作,例如将性别转为数字类型
# 这种快捷方式一定要用括号包裹的列表推导式
[1 if x =='male' else 0 for x in df.Sex]
df.Sex = [1 if x =='male' else 0 for x in df.Sex]

为了防止出现线性关系,将Pclass进行one hot编码,在之前的文章中也记录过这个原因
pd.get_dummies(df.Pclass,
              prefix="p",
              prefix_sep="")
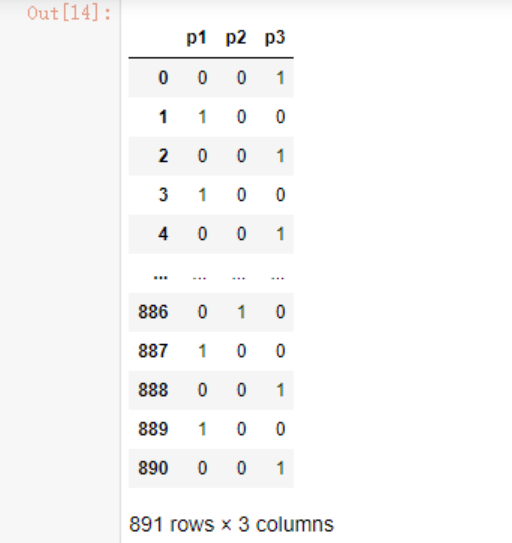
df = df.merge(pd.get_dummies(df.Pclass,
              prefix="p",
              prefix_sep=""),
         left_index=True,
        right_index=True)
df.drop('Pclass',
        axis=1,
       inplace=True)
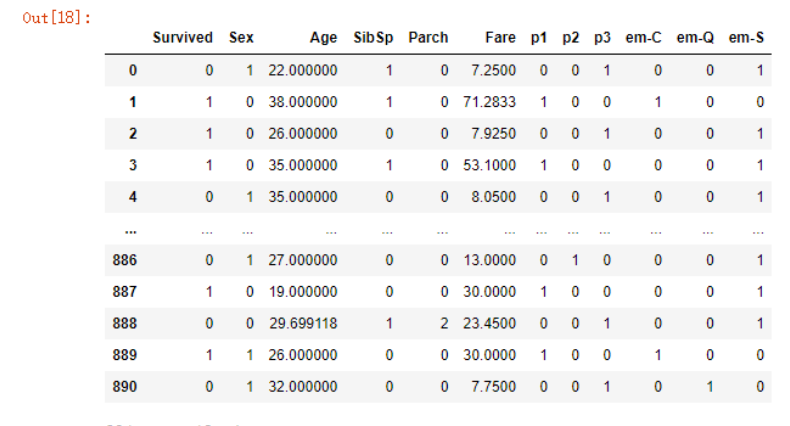
同样的登船地点处理:
#第一列的0是我们填充的缺失值
#没有任何意义,合并时就给去了
df = df.merge(pd.get_dummies(df.Embarked,
              prefix="em",
              prefix_sep="-",
              drop_first=True),
         left_index=True,
        right_index=True)
df.drop('Embarked',
        axis=1,
       inplace=True)
最终的数据样式
制作训练、测试数据
data_train = df[[x for x in df.columns if x !='Survived']]
data_test = df['Survived']
x_train,x_test,y_train,y_test = train_test_split(data_train, data_test)
建立决策树模型,不得不说sklearn封装的实在是太好了,调用的方法基本一样,我们先使用默认的参数
from sklearn.tree import DecisionTreeClassifier
model = DecisionTreeClassifier()
model.fit(x_train, y_train)
model.score(x_test, y_test)
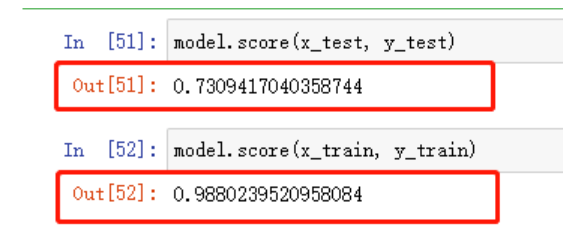
可以看到,测试集上73%的准确率,如果想自己计算准确率也是可以的
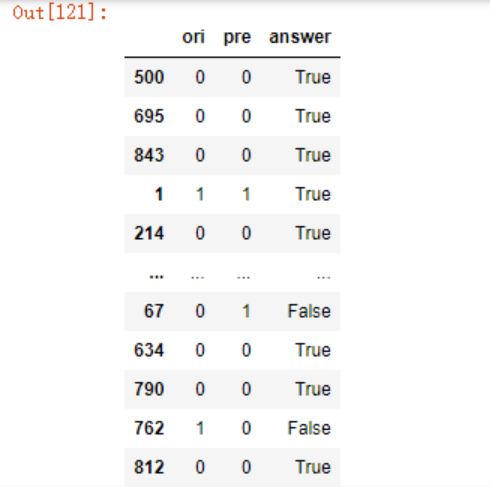
predict_df = pd.DataFrame({"ori": y_test,
                          "pre": model.predict(x_test)})
predict_df = predict_df.assign(answer = predict_df.ori == predict_df.pre)
predict_df
predict_df.answer.sum()/len(predict_df)

训练集上98%的准确率,测试集只有73%,很明显,泛化能力不行,需要解决过拟合的问题。
我们先来看下官方文档DecisionTreeClassifier介绍
Init signature:
DecisionTreeClassifier(
    *,
    criterion='gini',
    splitter='best',
    max_depth=None,
    min_samples_split=2,
    min_samples_leaf=1,
    min_weight_fraction_leaf=0.0,
    max_features=None,
    random_state=None,
    max_leaf_nodes=None,
    min_impurity_decrease=0.0,
    min_impurity_split=None,
    class_weight=None,
    ccp_alpha=0.0,
)
看看max_depth(控制深度)
max_depth : int, default=None
    The maximum depth of the tree. If None, then nodes are expanded until
    all leaves are pure or until all leaves contain less than
    min_samples_split samples.
上面说过,有三种解决方案,其中第三种就是控制深度,max_depth如果不设置,则节点会不停的(通过决策)扩张直到所有叶子变成纯的或者所有的叶子包含的样本少于min_samples_split(内部节点再划分所需最小样本数)
我们可以人为的一个个调试max_depth,也可以写一个函数来进行测试,例如:
def setMaxDepth(max_depth):
    model = DecisionTreeClassifier(max_depth=max_depth)
    model.fit(x_train, y_train)
    train_score =model.score(x_train, y_train)
    test_score = model.score(x_test, y_test)
    return train_score, test_score
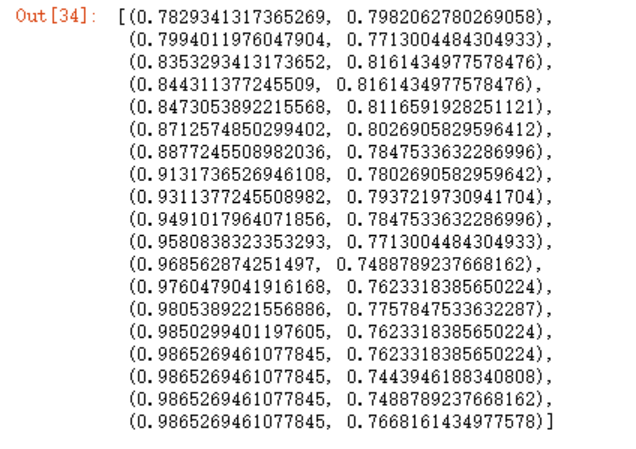
scores = [setMaxDepth(x) for x in range(1,20)]
scores
d_train = [s[0] for s in scores]
d_test = [s[1] for s in scores]
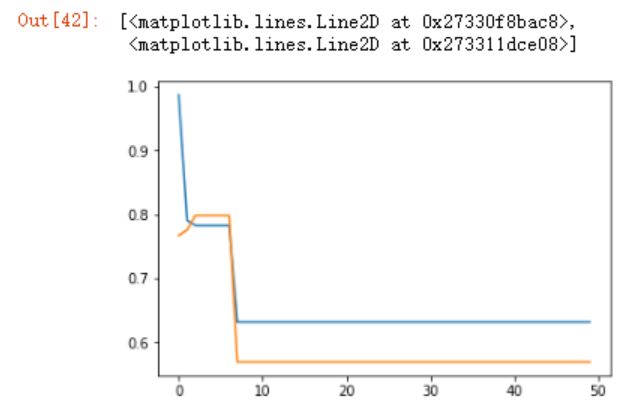
plt.plot(d_train)
plt.plot(d_test)
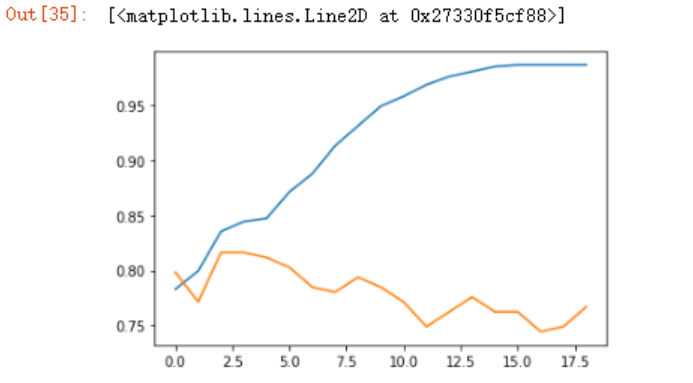
可以看到depth=2时,测试集的效果最佳。
再来看下min_impurity_split(基尼系数),
min_impurity_split : float, default=0
    Threshold for early stopping in tree growth. A node will split
    if its impurity is above the threshold, otherwise it is a leaf.

    .. deprecated:: 0.19
       ``min_impurity_split`` has been deprecated in favor of
       ``min_impurity_decrease`` in 0.19. The default value of
       ``min_impurity_split`` has changed from 1e-7 to 0 in 0.23 and it
       will be removed in 1.0 (renaming of 0.25).
       Use ``min_impurity_decrease`` instead.
提前停止决策树生长的(信息增益)阈值。如果一个节点的基尼不纯度在这个阈值之上则会继续往下分支,否则它就是叶子节点,即小于这个阈值时节点不会再生成子节点。使用min_impurity_decrease来替换。
def setMinImpuritySplit(min_impurity_split):
    model = DecisionTreeClassifier(min_impurity_decrease=min_impurity_split)
    model.fit(x_train, y_train)
    train_score =model.score(x_train, y_train)
    test_score = model.score(x_test, y_test)
    return train_score, test_score
min_range = np.linspace(0,1,50)
scores_2 = [setMinImpuritySplit(x) for x in min_range]
data_train_2 = [ x[0] for x in scores_2]
data_test_2 = [ x[1] for x in scores_2]
plt.plot(data_train_2)
plt.plot(data_test_2
获取最大值
best_index = np.argmax(data_test_2)
data_test_2[best_index],data_train_2[best_index]

同时获得最好的min_impurity_split
min_range[best_index]

到了这里,我们就需要考虑一个问题了,在我再次使用这个流程测试了几遍之后,发现每一次的结果不尽相同,主要有三个点可能存在影响
- train_test_split划分数据时,由于数据的随机性以及测试数据集的size选取
- max_depth参数
- min_impurity_decrease参数
我们可以多次测试以取得平均值。例如,在测试集为30%时,设定max_depth参数为1,循环取min_impurity_decrease为0-1,再设定max_depth为2,再循环,以此类推,取得最优解,但是这种做法太费代码。
在sklearn中,我们可以使用交叉验证(解决测试集问题)解决随机划分的差异问题,例如将数据分为5份,第一份为训练集,其它四份为测试集,再使用第二份为训练集,其它四份为测试集,以此类推,获得其平均值,这样可以避免某一份数据只是用于训练而不参与测试(例如上面使用train_test_split划分的数据);而关于多参数的选择,sklearn中也有现成的工具GridSearchCV(和train_test_split位于同一个库),CV就是指Cross-validation。
照例,还是先看下GridSearchCV的官方文档介绍:
Init signature:
GridSearchCV(
    estimator,
    param_grid,
    *,
    scoring=None,
    n_jobs=None,
    refit=True,
    cv=None,
    verbose=0,
    pre_dispatch='2*n_jobs',
    error_score=nan,
    return_train_score=False,
)
其中我目前接触的有param_grid和cv:
estimator : estimator object.
    This is assumed to implement the scikit-learn estimator interface.
    Either estimator needs to provide a ``score`` function,
    or ``scoring`` must be passed.
param_grid : dict or list of dictionaries
    Dictionary with parameters names (`str`) as keys and lists of
    parameter settings to try as values, or a list of such
    dictionaries, in which case the grids spanned by each dictionary
    in the list are explored. This enables searching over any sequence
    of parameter settings.
cv : int, cross-validation generator or an iterable, default=None
    Determines the cross-validation splitting strategy.
    Possible inputs for cv are:

    - None, to use the default 5-fold cross validation,
    - integer, to specify the number of folds in a `(Stratified)KFold`,
    - :term:`CV splitter`,
    - An iterable yielding (train, test) splits as arrays of indices.

    For integer/None inputs, if the estimator is a classifier and ``y`` is
    either binary or multiclass, :class:`StratifiedKFold` is used. In all
    other cases, :class:`KFold` is used. These splitters are instantiated
    with `shuffle=False` so the splits will be the same across calls.

    Refer :ref:`User Guide <cross_validation>` for the various
    cross-validation strategies that can be used here.

    .. versionchanged:: 0.22
        ``cv`` default value if None changed from 3-fold to 5-fold.
可以看到自0.22版本之后cv默认5折交叉验证。
from sklearn.model_selection import GridSearchCV
max_depth=range(1,10)
min_impurity_decrease = np.linspace(0,1,50)
param_grid ={"max_depth":max_depth,
            "min_impurity_decrease":min_impurity_decrease}
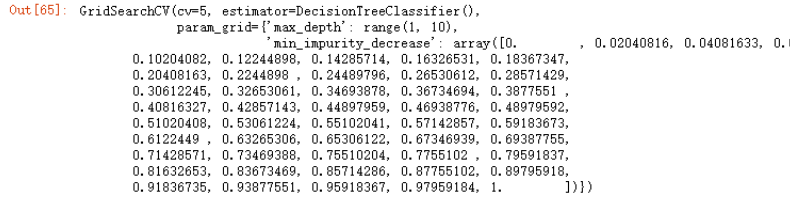
model = GridSearchCV(estimator=DecisionTreeClassifier(),
             param_grid=param_grid,
            cv=5)
model
#不用划分数据了
#全部数据丢进去训练
model.fit(data_train, data_test)
model.best_params_

#测试集上最好的得分
model.best_score_

参考:https://www.cnblogs.com/zhhfan/p/10476761.html
https://blog.csdn.net/weixin_42575020/article/details/82949285
https://www.cnblogs.com/xiaoyh/p/11321780.html
https://www.cnblogs.com/baby-lily/p/10646226.html